Locations are used to specify where your products are stored in the warehouse.
A location can, for example, be a physical warehouse, a department, a rack, a shelf, or an area within the warehouse. If you need a more detailed structure, you can also create sublocations.
Table of contents
- What is a location?
- Default location on a product
- Actual stock levels across locations
- Create a location
- Create a sublocation
- View product stock levels by location
What is a location?
A location is the place where a product is stored in the warehouse.
Locations help you keep track of where your products are stored. They are particularly useful if you have multiple warehouses, different storage areas, or want to organize your warehouse into racks and shelves.
Examples of locations include:
- Main warehouse
- Store
- External warehouse
- Rack A
- Shelf 01
- Rack A
- Quarantine warehouse
- Consignment warehouse
Default location on a product
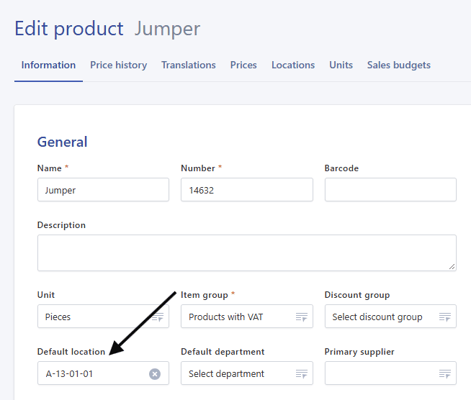
You can specify a default location for each product.
The default location is suggested when the product is included in stock movements, such as receiving goods, transferring stock, or other inventory transactions.
Important: The default location does not necessarily indicate where the product is currently stored. It serves as a default value that Rackbeat can suggest for future transactions.
To select a default location for a product:
- Go to Products > Products.
- Open the product you want to edit.
- Select the location in the Default location field.
- Click Save changes.
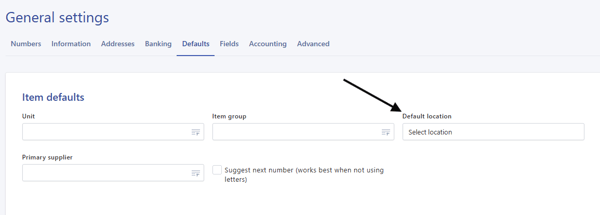
To set a general default location for all new products, you can configure this in the company settings.
- Go to Company settings > General.
- Click the Defaults tab.
- Select the location under Products > Default location.
Changing the default location on a product does not automatically move any existing stock.
Actual stock levels across locations
Actual stock levels show how many units of a product are stored at each location.
For example, even if a product has Main warehouse as its default location, it may still have stock at other locations if the product has been received, transferred, or registered there.
Example:
| Location | Quantity |
|---|---|
| Main warehouse | 10 pcs. |
| Store | 4 pcs. |
| Quarantine | 2 pcs. |
In this case, the product's default location may still be Main warehouse, even though its actual stock is distributed across several locations.
Create a location
You can create locations if you need to track stock across multiple storage areas.
To create a location:
- Go to Items > Locations.
- Click "Create new".
- Enter a name or number for the location.
- Fill in any additional information.
- Click Save.
The location can now be used for products and inventory transactions.
Create a sublocation
Sublocations can be used to divide a location into smaller storage areas.
For example, you may have a main warehouse that you want to divide into racks, shelves, or zones.
You can also create sublocations within existing sublocations if you need multiple levels.
Example:
| Parent location | Sublocation |
|---|---|
| Main warehouse | Rack A |
| Main warehouse | Rack B |
| Rack A | Shelf 01 |
To create a sublocation:
- Go to Inventory > Locations.
- Open an existing location by clicking its number or selecting Edit.
- Click "Create sublocation".
- Enter a name and number for the sublocation.
- Click Save.
The sublocation can now be used to specify more precisely where products are stored in the warehouse.
When should you use sublocations?
Sublocations are useful when you need more detailed inventory management.
For example, you may want to keep track of:
- Which rack a product is stored on
- Which shelf a product is stored on
- Whether a product is stored in an area for returns, defective goods, or quarantine
If you only have one small warehouse, a few locations may be sufficient. However, if you have a larger warehouse or many products, sublocations can make it easier to find and manage your stock.
View product stock levels by location
You can view a product's stock levels in three ways:
- From the product overview
- From the Locations tab on the product
- Using the Stock counting report
From the product overview
You can use a drop-down menu in the product overview to see which locations hold stock of a particular product.
- Go to Items > Products.
- Find or search for the product in the overview.
- Click the two arrows to the left of the product number.

Tip: You can also adjust stock levels directly from the product overview. Hover over the three dots next to the product and click Adjust stock.
From the Locations tab on the product
You can also view a product's stock levels by location directly from the product.
Here, you can adjust stock quantities and update the minimum stock level and minimum order quantity for each location.
To do this:
- Go to Items > Products.
- Find and open the product.
- Go to the Locations tab.
Using the Stock counting report
If you need a more detailed overview, you can use the Stock counting report.
The report allows you to view total stock levels or stock levels by location for all products, selected products, locations, or product groups.
To generate the report:
- Go to Reporting > Stock counting.
- Enter your desired criteria.
- Check Show per location if you want to see stock levels broken down by location.
- Click Search.
- Click Download sheet if you want to download the report.
Read more in the full guide: Report: Stock counting.